Helpful Hints
06 Feb, 2011 |
 |
Helpful Hints
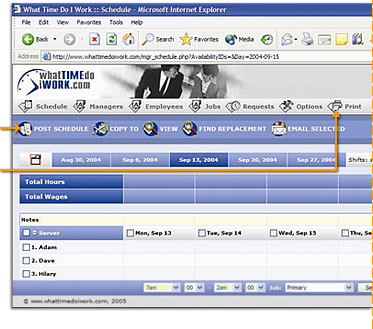
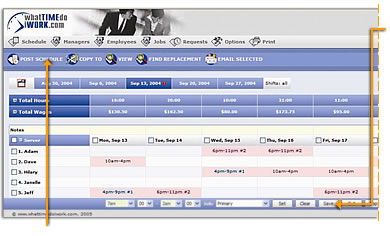
On the SCHEDULE page |
|
|
 |
|
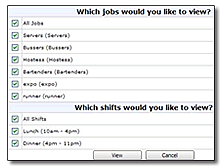 |
Select VIEW to limit the
Jobs & Shifts that you see. |
|
| Select COPY TO and you can copy any week to any future week. |
| |
- Select the Jobs & Shifts to copy.
- Select the week to COPY FROM & the week to COPY TO .
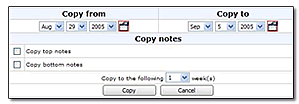 Select the COPY button at the bottom of the window. Select the COPY button at the bottom of the window.- * Would you like to Copy the Notes with the schedule?
- * Would you like to copy this same schedule to multiple weeks in the future?
- Copy to the Following ## of Weeks after the COPY TO week.
|
|
|
|
|
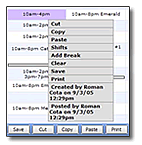 |
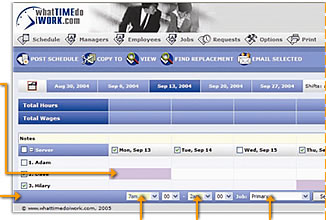
Right click on any cell to open your mouse menu.

This menu will provide quick access to some helpful functionsUse Cut, Copy & Paste to make your scheduling easier. |
|
|
|
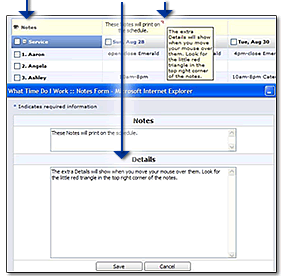
| Add Daily or Weekly Notes to each Primary Job ListAn open eye means that employees can see these notes |
 |
Type directly into the cells, or double click to open the Details.Hover your mouse where you see a red triangle to display the Details |
|
 |
|
 |
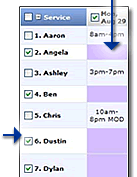
Find a Replacement for a shift by selecting the cell & then select Find Replacement .* All possible replacements will be selected. |
|
| The employees selected are not already working, are available, have not requested the day off and are allowed to work this job. |
 |
|
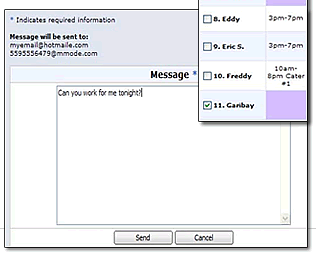
Send an Instant Message
to the Employees! |
|
|
| Now that these employees are checked, select the EMAIL SELECTED button to send an instant message to their cell phones & emails. |
|
 |
|
|
|
|
|
Getting Started
05 Feb, 2011 |
| The Basics of Scheduling |
 |
Set:
Set some shifts. |
|
 |
Save:
Save your changes. |
|
 |
Post:
Post the schedule for the employees to see. |
|
 |
Print:
Print your schedule. |
|
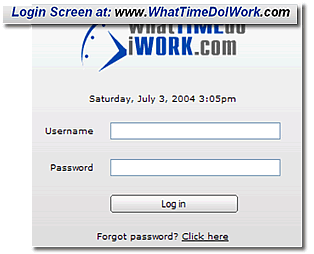
This screen
will appear after you have logged in, and are viewing the SCHEDULE page… |
|
|
Set:
Set some shifts. |
|
|
 |
|
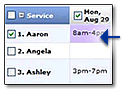
| Use the cursor to select a cell or group of cells on the schedule. This will turn the cell(s) PURPLE.You can also hold the CONTROL button on your keyboard while doing this to select many different groups of cells. |
| A Cell is the square on the schedule that corresponds to an employee & a day of the week. |
|
| Now that you have selected the desired cells and they appear purple, it is time to select the times/shifts to enter into the cell(s).At the bottom of your screen is a TOOLBAR, and on the left side you will see pull down menus for times of the day. |
|
 |
Select the start time, end time & additional job
description of the desired shift. |
|
|
| |
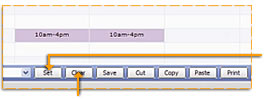 |
| To remove a shift, select the desired cell(s), then select the CLEAR button. |
|
| Once you have chosen the desired shift and job from the toolbar, select the SET button to the right. You should notice that the shift is now appearing in all chosen cells. Repeat this process to create all the shifts of the week. |
| The CLEAR button only affects the cells that appear purple. |
|
|
|
| To add multiple shifts within a single day for an employee, double-click on the desired cell to open the multiple shifts window. |
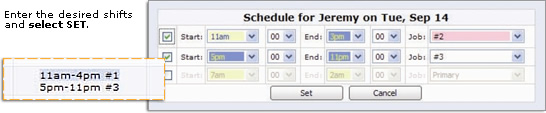 |
| |
 |
|
Post:
Post the schedule for the employees to see. |
|
|
|
Save:
Save your changes. |
|
| Once you have created all the desired shifts, select the SAVE button to save your changes to the schedule. The system will take a few moments to reload the screen. |
| Once the schedule has reloaded, you will notice that the cell(s) you have changed now appear pink. |
|
| These are all changes to the schedule that have not been posted yet.You can continue to work on any schedule, until you are ready to post your changes for the employees to see. |
|
|
| When you are ready to allow the employees to see the new schedule, select the POST SCHEDULE button at the top left of the screen.This will update the employee’s side of the system while sending messages to their cell phones & emails. |
 |
|
|
Print:
Print your schedule. |
|
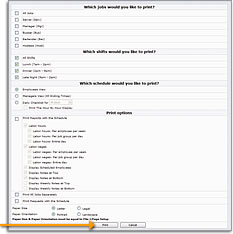
At the top of the SCHEDULE screen in the grey bar, select PRINT. This will open the print window to allow you to customize your print.
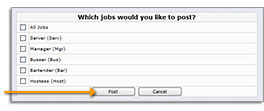
Start by selecting the jobs that you would like to print. For a Weekly View proceed to the bottom of the window and select the PRINT button.The system will display a printer friendly version of the Weekly View, and the system will open your printer’s window.
Now just select PRINT from your printer’s window.For a Daily View, about half way down you will see “Which Schedule would you like to Print?”.
Select the DAILY CHECKLIST and the desired day.Now proceed to the bottom of the window and select PRINT. |
|
 |
|
|
Welcome to What Time Do I Work.com
04 Feb, 2011 | Tags: Employee Schedule, Employee schedule calendar, Employee Scheduling, Employee Scheduling Software, Employees Schedules, job schedule, Job Scheduling Software, Medical Scheduling, Medical Scheduling Software, online employee scheduling software, Online Restaurant Scheduling Software, online schedule, Online Scheduler, Online Scheduling, Online Scheduling Software, restaurant schedules, Retail Scheduling, Schedule, Scheduling, Scheduling Software, Shift Scheduling, Staff Scheduling, Staff Scheduling Software, Web Scheduling Software, What Time do I Work, Whattimedoiwork.com, Work Scheduler, Work Scheduling, Workforce Scheduling, workscheduling
|
|
|
 |
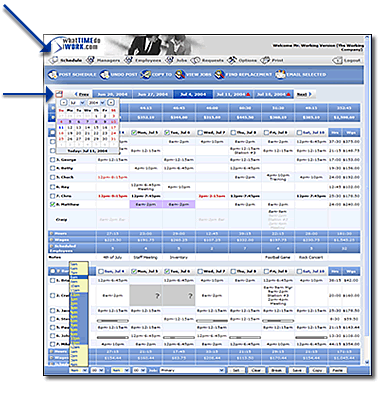
The first page that opens after login will have this grey bar across the top of the screen. These are all the pages of What Time Do I Work.com, and you will be able to navigate through the system by using this grey bar. |
|
If the schedule is not already displayed, double click on the word SCHEDULE to open the current week on the Schedule page . |
|
|
|
 |
|