Print

21 Feb, 2011 |

Print: Customize your Print.
Customize your options, & select the PRINT button.
The system will display a printer friendly version of your schedule, as well as open your printer’s window.
Now just select PRINT from your printer’s window.
At the top of your screen in the grey bar, select PRINT . This will open the print window to allow you to customize your print.
Which jobs & shifts would you like to print ?
Start by selecting the Jobs & Shifts that you would like to Print.
A selected Shift, will only print the employee shifts that intersect with it.
Which schedule would you like to print ?
Employees View
is what the employees are allowed to see.
Managers View will include all employee ending times.
The Daily Checklist prints only employees working that day, separated by their primary jobs and listed in the order of their starting times.
Print Options:
Set your preferred defaults in the OPTIONS page.
Print Reports with the Schedule will activate all the reports below.
Which reports would you like to print with the schedule?
* Choose your preferred combination of Hours & Wages.
Print the Scheduled Employees.
Print Weekly or Daily Notes, on the Top or Bottom of all lists.
Would you like to print each job on a separate piece of paper?
Would you like to Print Requests on the Schedule?
Legal or Landscape will create a larger print of the schedule.
* Paper Size & Paper Orientation must be the same as your printer.
( File->Page Setup->“Look for Paper Size & Paper Orientation”)
Print an Updated
Phone List on the
EMPLOYEES page
Do you see every other row highlighted in grey? Are the colors printing?
Select the “Tools” menu at the top of your browser.
Select “Internet Options”. Select the “Advanced” tab.
About 2/3 the way down, look for the heading “ Printing ”.
Check the checkbox for “ Print background colors & images ”.
Select “ OK ” at the bottom of the window.

Print the
Daily or
Weekly
Schedule

Options Page

15 Feb, 2011 |

OPTIONS PAGE
 
Change Username / Password :
Complete all four fields & select SAVE to
change your login information.
Notifications:
Send schedule changes to your employees emails & cell phones.
General Settings :
Choose your preferred Language & Currency .
Select the Number of Weeks to Display for quick access.
What day of the week does your schedule start on?
Do you prefer 12 hour ( AM/PM ) or 24 hour ( Military Time )?
Select your Time Zone ? Are your employees in the same Time Zone ?
Managers are anyone that can edit portions of the schedule.
Open & Close are possible, but they don’t calculate Hours or Wages.
If an employee isn’t scheduled on a day, choose what to display.
Start by choosing what you would like to View each time you log in.
Hours of Operation :
What is the earliest Start Time , and the latest Ending Time?
* If you Schedule 24 hours a Day: Set these times to the same time and this is the Break in the Day . Where should the hours be applied?
Set some Shifts to be displayed with the start times for quick access.
Preferences :
Can employees view Requests , and when should they be submitted?
Can employees use Requests, Availability, or Contact Information?
Do you like to see the Availability bars on the weekly schedule?
Would you like to view the Wages on the EMPLOYEES page?
Would you like to Print Reports or Requests on the paper Schedule?
Show on Contact List ” is what the employees have allowed the other employees to see. Check this if you print a phone list for employees.
Would you like to print each job on a separate piece of paper?
Print Options :
Legal or Landscape will create a larger print of the schedule.
* Paper Size & Paper Orientation must be the same as your printer. ( File -> Page Setup ->“ Look for Paper Size & Paper Orientation ”)
Reports:
Which reports would you like displayed with the schedule?
* Choose your preferred combination of Hours & Wages.
Percentages: Divide your scheduled labor by a value such as sales.
View the number of Scheduled Employees , with the
breakdown.
Display Weekly or Daily Notes, on the Top or Bottom of all lists.
* Which notes would you like to Show to Employees ?

Add, Edit or Remove Jobs

09 Feb, 2011 |

Add, Edit, or Remove Jobs

Start by selecting the Jobs page at the top of your screen.
You will notice two sections on the Jobs page, the List of Jobs on the left and the Job Details on the right.

For now, let’s start on the left with the List of Jobs.

Primary Jobs have their own listing on the Schedule with employees underneath.
Stations are the positions under each Primary Job.Stations can be assigned in the Job Details section to the right. 

Additional Jobs are extra jobs or special situations.

To Edit a Job

Click on the name of the Job to display the Details on the right.

Make any needed changes, and then select “Save”

The Remaining Details are Optional
To Remove a JobCheck the checkbox to the left of the Jobs name. Then select the Remove Selected button at the top of the page. 

To Add a New Job

Select the Add Job button at the top of the page.
* Complete the Required Information and select “Save”.

The new job will need a.

Job Name
Job Code:
To display in the cells. (Limited to 10 characters)
Optional: Job Abbreviation (Allows 3 characters to be sent to cell phones)

View the Other Jobs
Display to the Other Jobs
Example: Managers may View the Other Jobs (Yes), but Managers should not be Displayed to the Other Jobs (No).
Show Ending Times Are the employees aloud to see the Ending Times for this job.
Max Hours Per Day
Max Hours Per Week
WTDIW will alert you if an employee exceeds these limits for the particular job. Daily Alert will turn the shift Red. Weekly Alert will turn the entire week of shifts Bold .
Default Schedule Time
If a Job has specific Start & End Times on 1 or more days, then WTDIW will automatically set these times in the scheduling toolbar for you when the Job is chosen. You may still edit these times after they appear.
Job Color Apply To
Highlight the shifts of this Job on the schedule. Allow the employees of the other jobs to work this job.

Requests

08 Feb, 2011 |

Requests

The Requests page will keep a log of all employee requests, and which requests have been Accepted,
Declined or are still Pending.

 
Sort the list by selecting on the titles of each column.“Date Submitted” , “Employee” or “Date Requested”.Check the box to the left of the request, before selecting one of the buttons above the list.Dates Requested that are red, are 1-7 days in the future. 

Dates that are Yellow are 8-14 days in the future.

Black Dates are for more than 14 days in the future.

Rows that are Grey are in the past or Declined.

All requests from the log, are already displayed on the weekly schedule.AvailabilitySelect any of the availability bars to see a detailed view of it at the bottom of the page.
Days OffIf you would like to view the details of any request, select the status icon at the right side of the cell and the window below will appear. Schedule ConflictsIf any shift conflicts with an employees availability or requested days off, What Time Do I Work will notify you by displaying the message below.
 

Add, Edit, Remove Employees

07 Feb, 2011 |

To Add
an Employee

Start by selecting the EMPLOYEE page at the top of your screen.

Then select the “Add Employee” button.Complete the required information and select “Save” at the bottom of the window.
The required information *
will have a blue star next
to it.The new employee will
need a… 

Name
Username & Password
Primary Job.

Everything else is optional.

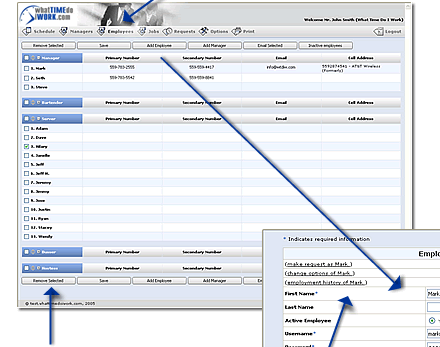
To Remove an Employee

Check the box to the left of the employees name and then select the “Remove Selected” button.

To Edit an Employee

Double click on any employees name to re-open their information. Make any needed changes, and then select “Save” at the bottom of the window.

You also have access to…
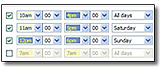
Submit Requests or Update Availability for an Employee!
From the employees information page, select (make request as…) to open this employees request page.
or
Change the Options for an Employee!
From the employees information page, select (change the options of…) to open this employees options page.
Details about these screens are on the following page.
 
 
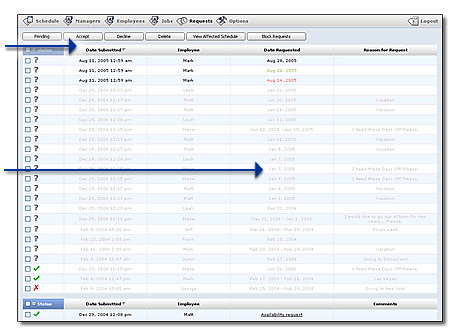
Employees Request Page
 
  Employees will know the status of their Requests
 
Will keep track of which requests have been Accepted or Declined, as well as the requests that are still Pending.
Submit the Employees Requests!

Use the Calendar Icons to select the Starting Date & Ending Date   of the days you would like to Request Off.

or
Highlight the 15 minute blocks that you are UNAVAILABLE to work and…
 

Submit the Employees Availability!

 
Employees Option Page
 
Update the Employees Contact Information
Check the box to display a particular number or address to the other employees.
(Only Management can view unchecked information.)
 
Would you like your Schedule sent to your Email or Cell Phone?

Start by entering the employees email above.

For the Cell Phone, first select the employees wireless carrier, and then enter the phone number or other required information.

 
A message will be sent to confirm that the address has been set up.The messages will be sent immediately, however they are dependent upon cell phone traffic at the moment and can sometimes take a few minutes to reach a particular phone.
Now just select which devices to send the different messages to.
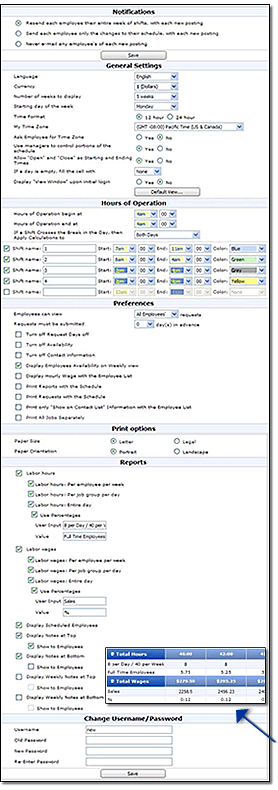
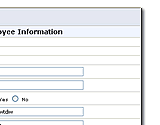
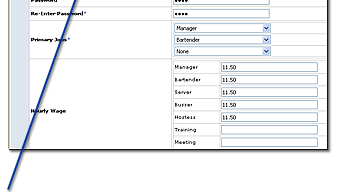
Update the Employees Username & Password
Complete the required fields and select Save to update their Username and/or Password .
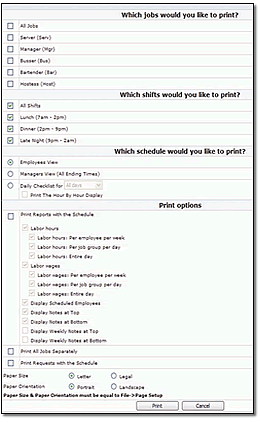
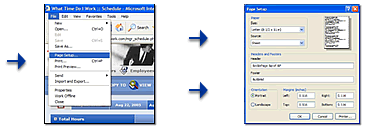
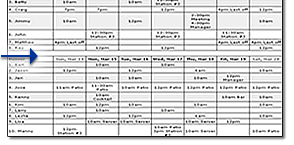
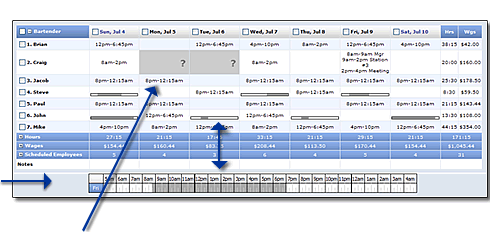